
Saga Pattern using Step Functions
Introduction
Order Processing System
To better understand the problem and the solution, let's walk through a real-world use case. Imagine we have a system that allows users to place orders and charge them for their purchase. If an error occurs the system should cancel all steps based on when the error occurred.
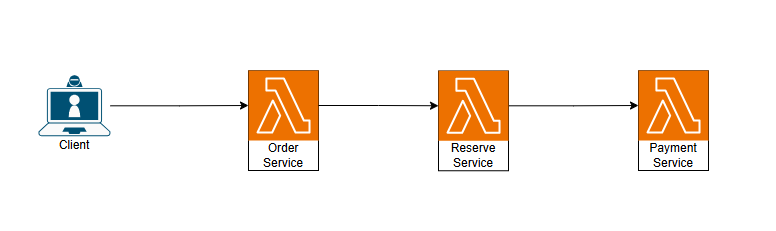
As we can see in the diagram above, our system has 3 services that call each other in order. This works fine when everything goes right, but it breaks when a service stops working or fails. If the stock reservation step fails, we need to cancel the order. If the payment fails, we need to cancel both the stock reservation and the order. With this setup, we cannot do these rollback steps.
Here is where the Saga Pattern comes into play. By orchestrating the 3 services using a State Machine created by AWS Step Functions, we can control the flow of transactions and handle failures gracefully.
The State Machine acts as a central orchestrator that manages the entire order processing workflow:
- Sequential Execution: The State Machine invokes each service (Create Order → Reserve Stock → Process Payment) in sequence, waiting for each to complete before moving to the next step.
- Error Handling: If any step fails, the State Machine detects the failure and triggers compensating transactions (rollback steps) in reverse order. For example, if payment fails, it will automatically trigger stock cancellation and order cancellation.
- Isolation: Each service is independent and doesn't need to know about the others. The State Machine handles all inter-service communication and state management.
- Durability: The State Machine maintains a complete audit trail of all steps taken, making it easy to track and debug transactions.
- Atomicity at Scale: While individual steps are not atomic, the saga pattern ensures that either all steps complete successfully or all are compensated, maintaining data consistency across services.
Implement the new architecture
To implement this new architecture, I will use the AWS SAM framework since we need to create multiple AWS Lambda functions and managing them manually would be hard. AWS SAM allows us to define these resources using code and deploy them to AWS with a single command, and this is the folder structure that we will use in our SAM project
saga-app/
│
├── template.yaml                 # Main nested stack template
├── samconfig.toml               # SAM configuration
│
├── stacks/
│   ├── compute.yaml # Lambda functions stack (Order, Inventory, Payment services)
│   └── orchestration.yaml       # Step Functions state machine stack
│
├── statemachines/
│   └── order-saga.asl.json      # Order Saga state machine definition
│
├── src/
│   ├── order/
│   │   ├── create.ts            # Create order handler
│   │   └── cancel.ts            # Cancel order handler (compensation)
│   │
│   ├── inventory/
│   │   ├── reserve.ts           # Reserve inventory handler
│   │   └── release.ts           # Release inventory handler (compensation)
│   │
│   └── payment/
│       ├── charge.ts            # Charge payment handler
│ └── refund.ts # Refund payment handler (compensation)Create the Lambda Functions
For these functions, I will just use simple code cuz in the end this is only for learning and there is no need to implement the real business logic.
//create order
import { Handler } from 'aws-lambda';

export const handler: Handler<OrderInput, OrderResult> = async (event) => {
  console.log('Creating order:', JSON.stringify(event, null, 2));

  try {
    // Implement order creation logic

    const result: OrderResult = {
      orderId: event.orderId,
      status: 'PENDING',
      createdAt: new Date().toISOString(),
      customerId: event.customerId,
    };

    console.log('Order created successfully:', JSON.stringify(result, null, 2));
    return result;
  } catch (error) {
    console.error('Error creating order:', error);
    throw error;
  }
};
//cancel order
export const handler: Handler<CancelOrderInput, CancelOrderResult> = async (event) => {
console.log('Cancelling order:', JSON.stringify(event, null, 2));
try {
//Implement order cancellation logic
const result: CancelOrderResult = {
orderId: event.orderId,
status: 'CANCELLED',
cancelledAt: new Date().toISOString(),
};
console.log('Order cancelled successfully:', JSON.stringify(result, null, 2));
return result;
} catch (error) {
console.error('Error cancelling order:', error);
throw error;
}
};The same goes for the other 4 functions, they will have the same structure but with different logic inside. After creating all these functions, we can deploy them to AWS using the SAM CLI and then we can create the state machine that will orchestrate them. We will define the state machine in a JSON file using Amazon States Language (ASL) and then reference it in our orchestration stack. In the next section, I will explain how to create the state machine and how it works.
Creating the State Machine
Now let's move to the inetrseting part where we will define The state machine using Amazon States Language (ASL) it is JSON based lang it describes the workflow of our order processing system,including the sequence of steps and the error handling logic. The state machine will call the Lambda functions we created earlier and handle any errors that may occur during the execution.
Inside the statemachines folder we craete the order-saga.asl.json file that will contain the definition of our state machine:
{
  "Comment": "Order Saga Pattern - Orchestrates order creation, inventory reservation, and payment processing with compensation logic",
  "StartAt": "CreateOrder",
  "States": {
    "CreateOrder": {

    },
    "ReserveInventory": {

    },
    "ChargePayment": {

    },
    "CompensateInventory": {

    },
    "CompensateOrder": {

    },
    "OrderSuccess": {

    },
    "OrderFailed": {

    }
  }
}
We start by defining the states of our state machine. Each state represents a step in our order processing workflow. The main states are CreateOrder, ReserveInventory, and ChargePayment. These states call the corresponding Lambda functions to perform their tasks. If any of these states fail, we have compensation states CompensateInventory and CompensateOrder that will be triggered to undo the previous steps. Finally, we have OrderSuccess and OrderFailed states to handle the final outcome of the process.
Our state machine start at the CreateOrder state so let's start by defining it:
"CreateOrder": {
      "Type": "Task",
      "Resource": "${CreateOrderFunctionArn}",
      "Next": "ReserveInventory",
      "Retry": [
        {
          "ErrorEquals": ["States.TaskFailed", "States.Timeout"],
          "IntervalSeconds": 2,
          "MaxAttempts": 3,
          "BackoffRate": 2.0
        }
      ],
      "Catch": [
        {
          "ErrorEquals": ["States.ALL"],
          "Next": "OrderFailed"
        }
      ]
    }
The code above defines CreateOrder as a Task state that invokes the Lambda function to create an order. The Resource field contains the Lambda ARN passed during deployment, and Next moves execution to ReserveInventory after success. The Retry field configures up to 3 retry attempts with exponential backoff, while Catch routes any unhandled error to OrderFailed.
Before we move to the next state, remember that a Task state represents one unit of work, such as invoking a Lambda function, and can include retry and error-handling rules.
Now let's define the ReserveInventory state, which is similar to CreateOrder but with different if it fails it will trigger the compensation state CompensateOrder to cancel the order that we created in the previous step.
 "ReserveInventory": {
      "Type": "Task",
      "Resource": "${ReserveInventoryFunctionArn}",
      "Next": "ChargePayment",
      "Retry": [
        {
          "ErrorEquals": ["States.TaskFailed", "States.Timeout"],
          "IntervalSeconds": 2,
          "MaxAttempts": 3,
          "BackoffRate": 2.0
        }
      ],
      "Catch": [
        {
          "ErrorEquals": ["States.ALL"],
          "Next": "CompensateOrder"
        }
      ]
    }
The same way we define the ChargePayment state, but if it fails it will trigger both compensation states CompensateInventory and CompensateOrder to cancel the order and release the reserved stock.
 "ChargePayment": {
      "Type": "Task",
      "Resource": "${ChargePaymentFunctionArn}",
      "Next": "OrderSuccess",
      "Retry": [
        {
          "ErrorEquals": ["States.TaskFailed", "States.Timeout"],
          "IntervalSeconds": 2,
          "MaxAttempts": 3,
          "BackoffRate": 2.0
        }
      ],
      "Catch": [
        {
          "ErrorEquals": ["States.ALL"],
          "Next": "CompensateInventory"
        }
      ]
    },
As we see in the code in the case of the fails the ChargePayment will not call the 2 compensation states it only calls the CompensateInventory state and the CompensateInventory itself will call the CompensateOrder state.
The last step is to define the compensation states and the final states OrderSuccess and OrderFailed.
 "CompensateInventory": {
      "Type": "Task",
      "Resource": "${ReleaseInventoryFunctionArn}",
      "Next": "CompensateOrder",
      "Retry": [
        {
          "ErrorEquals": ["States.TaskFailed", "States.Timeout"],
          "IntervalSeconds": 2,
          "MaxAttempts": 3,
          "BackoffRate": 2.0
        }
      ]
    },
    "CompensateOrder": {
      "Type": "Task",
      "Resource": "${CancelOrderFunctionArn}",
      "Next": "OrderFailed",
      "Retry": [
        {
          "ErrorEquals": ["States.TaskFailed", "States.Timeout"],
          "IntervalSeconds": 2,
          "MaxAttempts": 3,
          "BackoffRate": 2.0
        }
      ]
    },
    "OrderSuccess": {
      "Type": "Succeed"
    },
    "OrderFailed": {
      "Type": "Fail",
      "Error": "OrderSagaFailed",
      "Cause": "Order processing saga failed - order cancelled and compensation steps executed"
    }
The compensation states will be called in case of failure to undo the previous steps, and the final states will indicate whether the order processing was successful or failed. With this state machine defined, we can deploy it to AWS and it will orchestrate the entire order processing workflow, ensuring that all steps are executed in the correct order.
Deployment
Now that we have defined our Lambda functions and our state machine, we can deploy them to AWS using the SAM CLI. The SAM CLI will take care of packaging our code, creating the necessary AWS resources and deploying everything to AWS by running the following commands in the root of our SAM project:
sam build
sam deploy --guided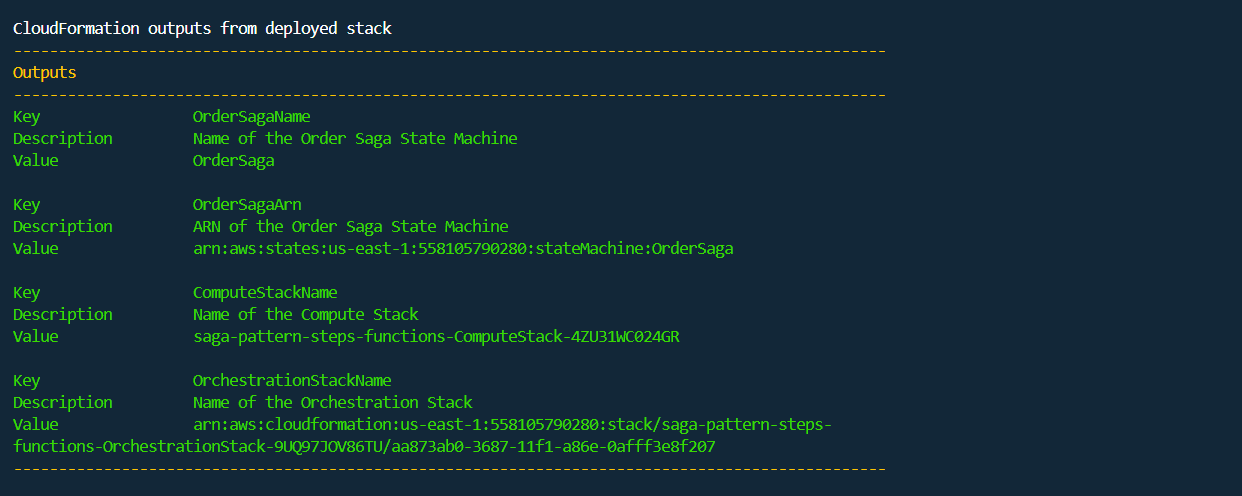
Deployment
as we see after runnig the commands all our infrastructure is deployed to AWS and if we go to the AWS console and check the Step Functions service we will find our state machine deployed and ready to use.
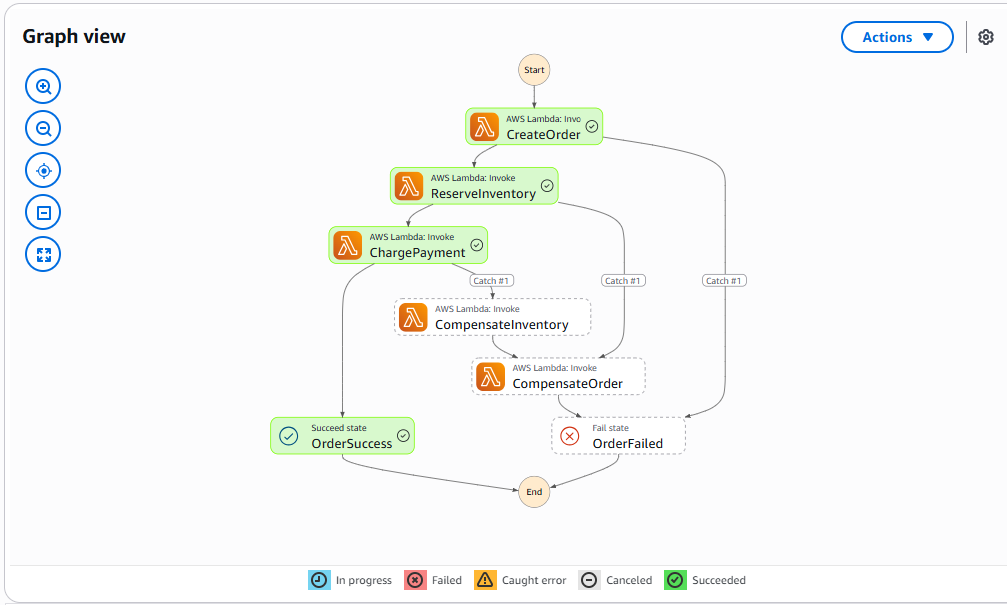
State Machine - happy path
To test the failure part i will just edit the code of the ChargePayment function to throw an error
export const handler: Handler<ChargePaymentInput, ChargePaymentResult> = async (event) => {
  try {
    // Simulate a payment failure
    throw new Error('Payment processing failed');
  } catch (error) {
    console.error('Error charging payment:', error);
    throw error;
  }
};
After editing the code and redeploying the function, we can see that the failure is handled gracefully and the compensation steps are executed as expected, the order is cancelled and the reserved stock is released.
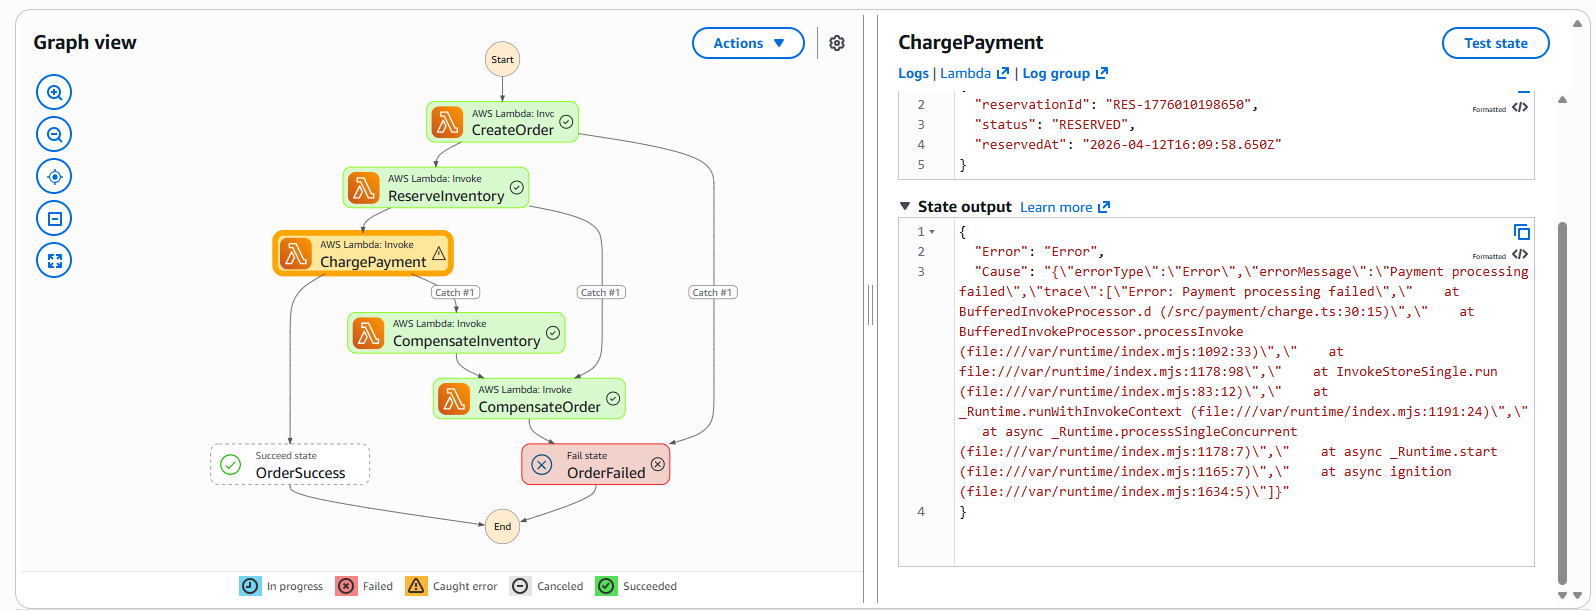
State Machine - failure path
Conclusion
The saga pattern is a powerful tool for managing transactions across distributed systems, and AWS Step Functions provides a robust platform for implementing this pattern. By orchestrating our services using a state machine, we can ensure that our system remains resilient in the face of failures, maintaining data consistency and providing a better user experience.