
Introduction
Why Index S3 Files
High-Level Architecture
During this post, we will build a fully serverless pipeline to handle S3 file indexing. We will create an automated system that tracks every file upload, extraction, and deletion in real-time, giving us instant search capabilities across the entire S3 bucket.
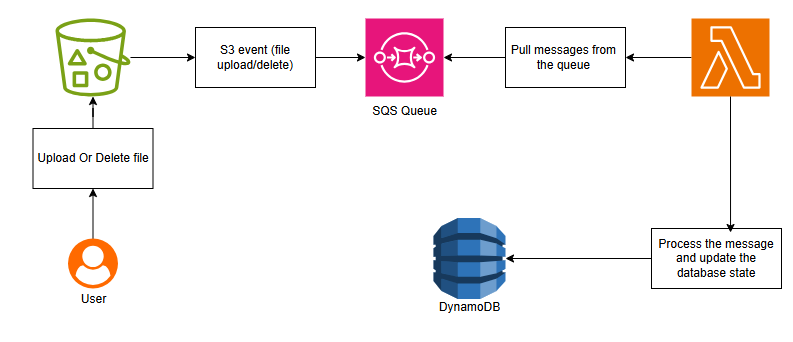
This architecture illustrates a serverless pipeline for managing S3 file events in real-time:
1. A user uploads or deletes a file in an S3 bucket. This action automatically triggers an S3 event.
2. The event is sent to an SQS Queue, which acts as a buffer to ensure that all events are processed reliably.
3. An AWS Lambda function pulls messages from the SQS queue. Lambda is serverless, meaning it automatically scales to handle the load and only runs when needed.
4. The Lambda function processes each message, updating the DynamoDB database to reflect the current state of files in the S3 bucket. This ensures that we always have an up-to-date index of all files.
This system provides a fully automated, real-time, and scalable solution for tracking file uploads, deletions, and modifications in an S3 bucket, all without managing any servers.
Provision Resources
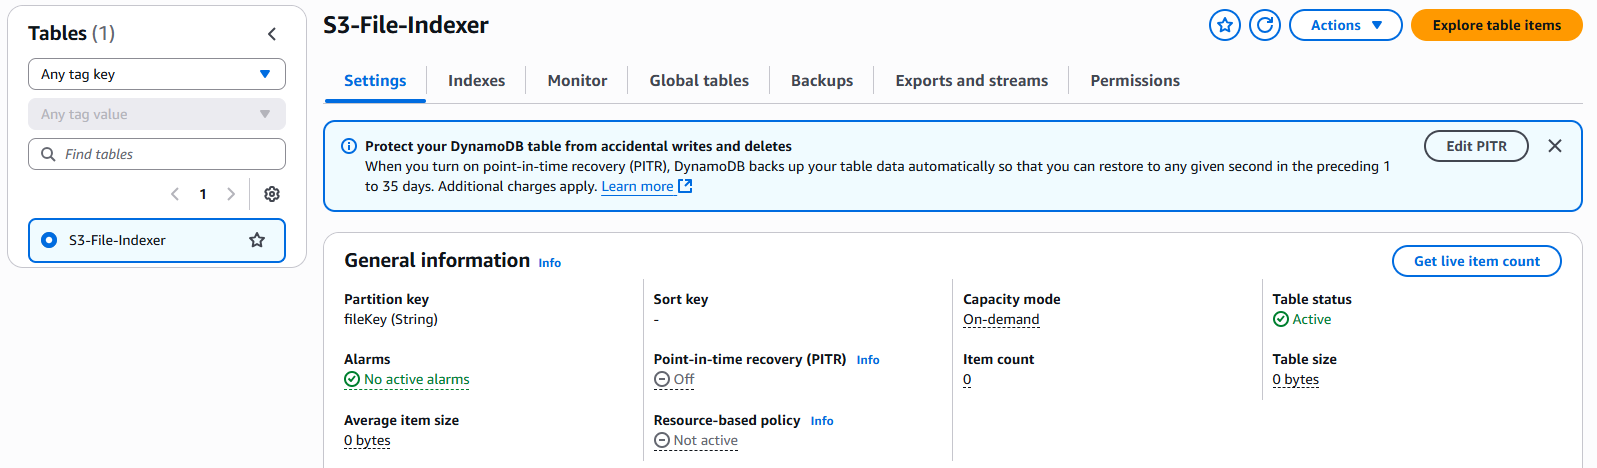
With our architecture in place, we are now ready to provision and implement all the necessary components starting by the DynamoDb table
DynamoDB Table
To set up our DynamoDB table, the first step is to determine which file Attributes we want to index. For this example, I have chosen the following Attributes
| Attribute | Description |
|---|---|
| fileKey | The full path or key in S3 (unique identifier) |
| userId | The unique identifier of the user who owns this file |
| bucketName | Name of the S3 bucket where the file is stored |
| fileName | File name (can be extracted from fileKey) |
| fileSize | Size in bytes |
| fileType | MIME type (e.g., application/pdf, image/png) |
| extension | File extension (e.g., .pdf, .jpg) |
| uploadedAt | Timestamp of when the file was uploaded |
Now that we know what data to store, we are ready to create the table. For this example, I will create it manually, but you can also use CloudFormation, CDK or Terraform.
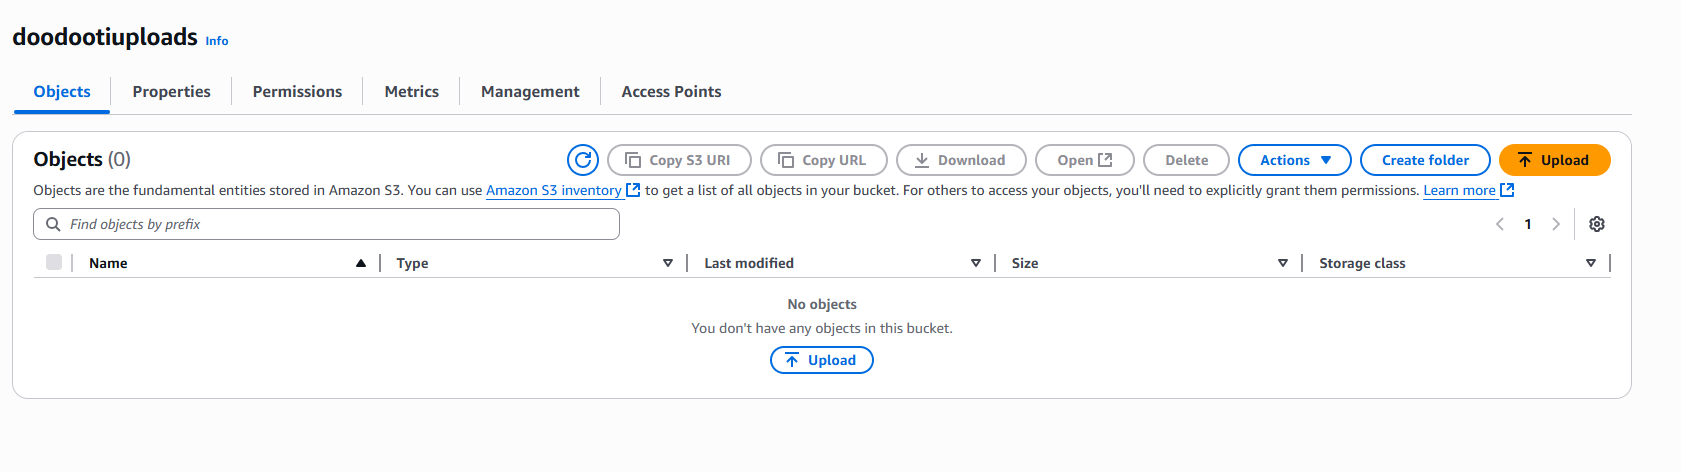
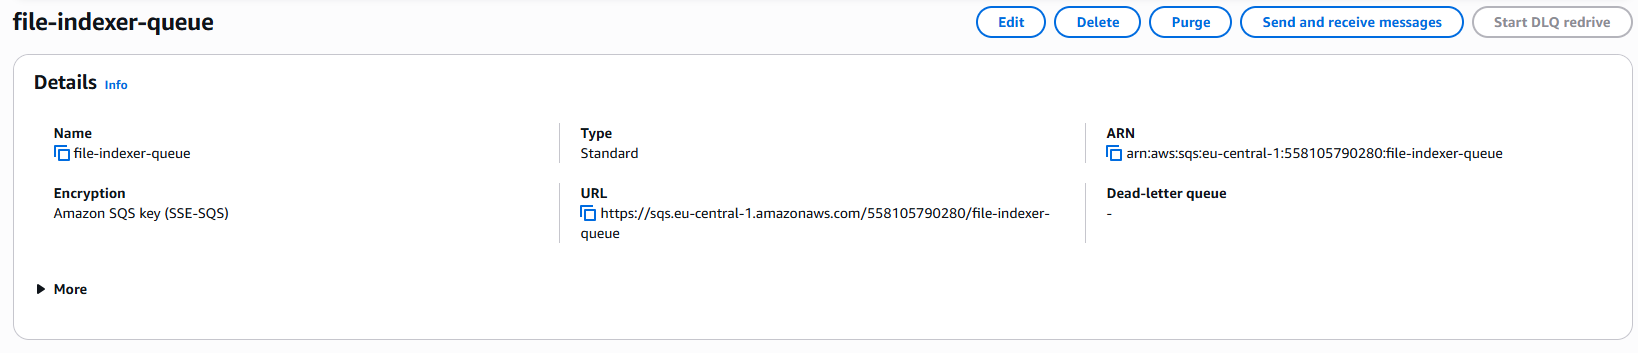
S3 Bucket and SQS Queue
Now it’s time to provision the S3 bucket that will store our files, along with the SQS queue that will receive events from S3 whenever a file is uploaded or deleted.
Starting with the bucket, I created one called doodootiuploads, and for the queue, I created file-indexer-queue, as shown in the images below.
S3 bucket creation
SQS queue creation
To allow S3 to send events to our SQS queue, we need to do some configuration. The first step is to attach a queue policy to the SQS queue, granting S3 permission to send events.
{
  "Version": "2012-10-17",
  "Id": "S3ToSQSPolicy",
  "Statement": [
    {
      "Effect": "Allow",
      "Principal": { "Service": "s3.amazonaws.com" },
      "Action": "SQS:SendMessage",
      "Resource": "arn:aws:sqs:us-east-1:123456789012:file-indexer-queue",
      "Condition": {
        "ArnEquals": {
          "aws:SourceArn": "arn:aws:s3:::doodootiuploads"
        }
      }
    }
  ]
}Next, we need to create an event notification for our S3 bucket. This ensures that whenever a file is uploaded or deleted, the SQS queue is triggered with the corresponding event.
We create an event notification in our S3 bucket by going to its properties, selecting Event notifications and creating a new notification. We choose the events to track, like uploads or deletions, and set our SQS queue as the destination.
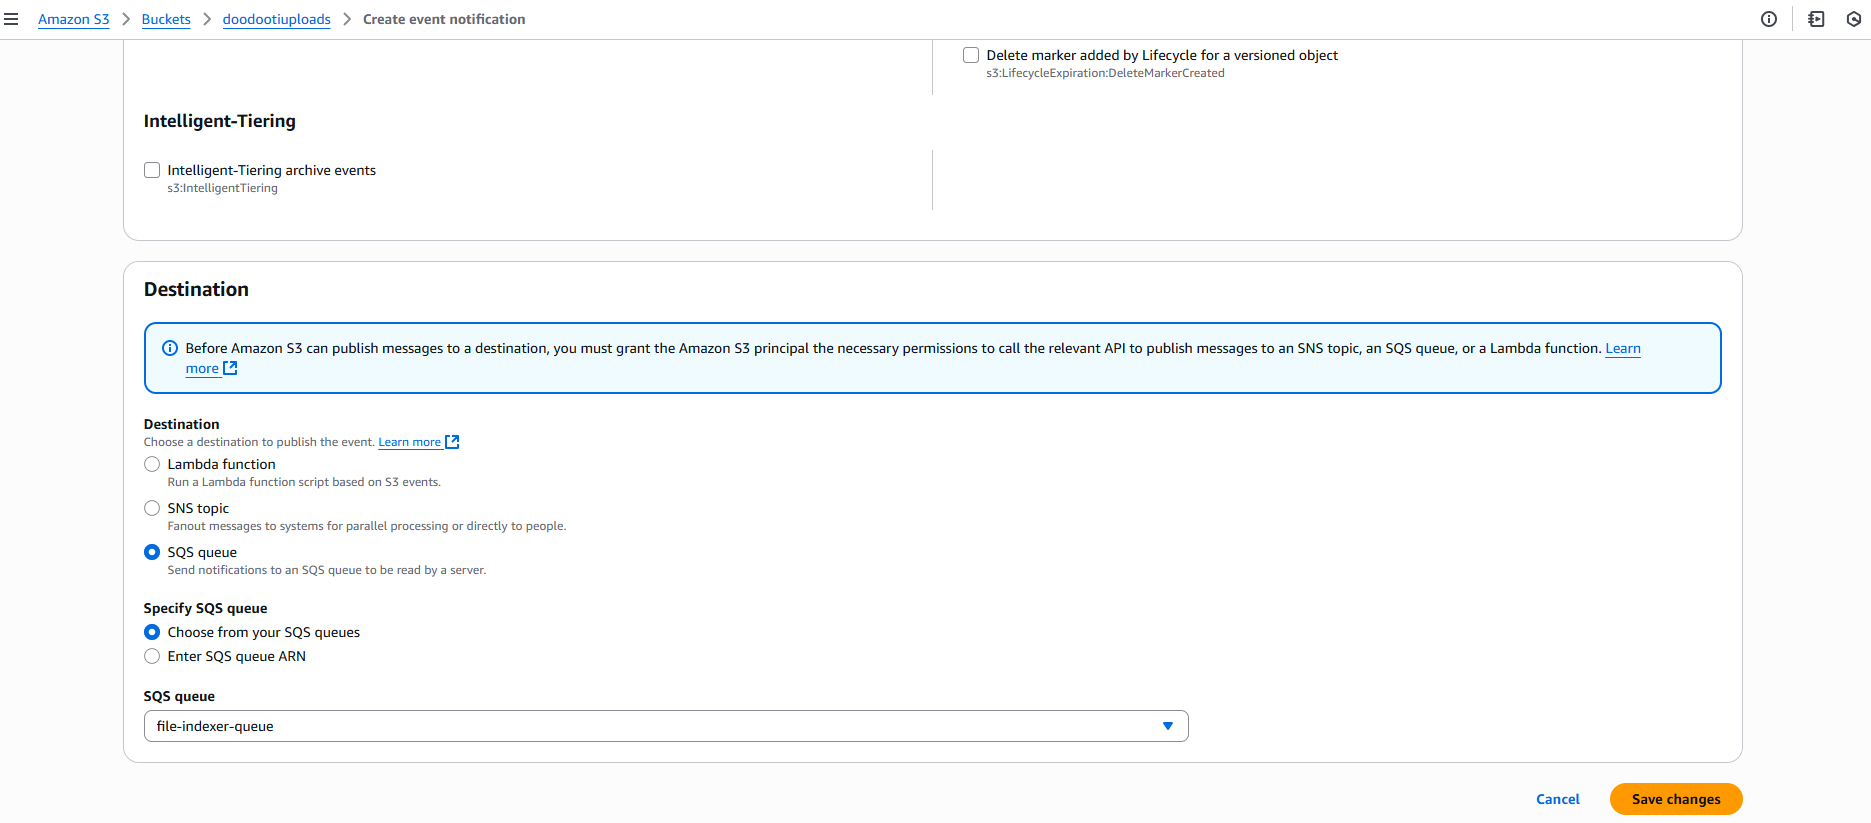
Event notifications
If you clicked Save changes and saw the error shown in the image below, the issue is likely that the SQS queue access policy is not configured correctly.

Event notifications
Lambda Function
The final and most important step is to create the Lambda function that will pull messages from the SQS queue, extract the metadata, and store this data in DynamoDB.
lambda function
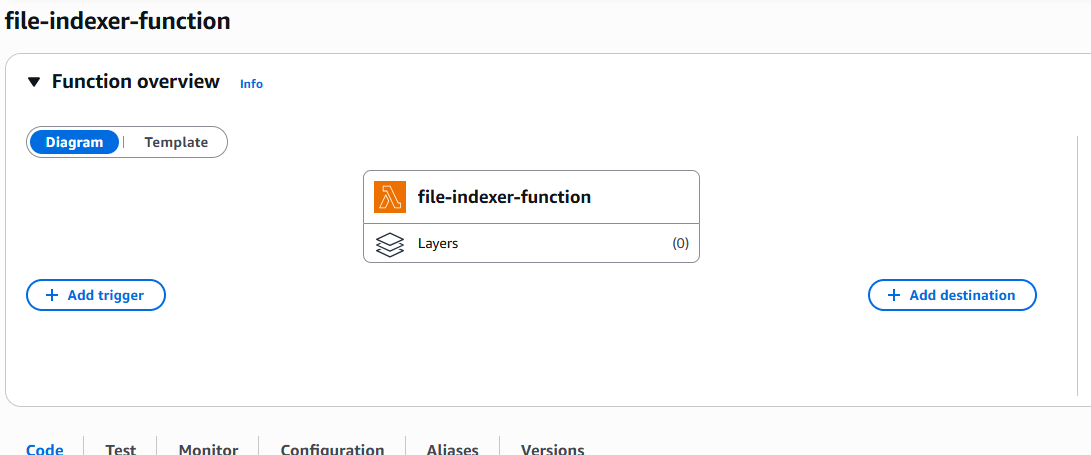
I started by creating a function called file-indexer-function. To make this function work, we first need to configure it to allow reading messages from SQS, and then add the appropriate code to process those messages.
The first step is to attach an IAM policy to the Lambda execution role, granting it permission to receive messages from the SQS queue and to write data into the DynamoDB table.
{
  "Version": "2012-10-17",
  "Statement": [
    {
      "Effect": "Allow",
      "Action": [
        "sqs:ReceiveMessage",
        "sqs:DeleteMessage",
        "sqs:GetQueueAttributes"
      ],
      "Resource": "arn:aws:sqs:us-east-1:123456789012:file-indexer-queue"
    },
    {
      "Effect": "Allow",
      "Action": [
        "dynamodb:PutItem",
        "dynamodb:UpdateItem",
        "dynamodb:DeleteItem"
      ],
      "Resource": "arn:aws:dynamodb:us-east-1:123456789012:table/S3-File-Indexer"
    }
  ]
}Next, from the Lambda UI, we need to add the SQS queue as a trigger for our function.
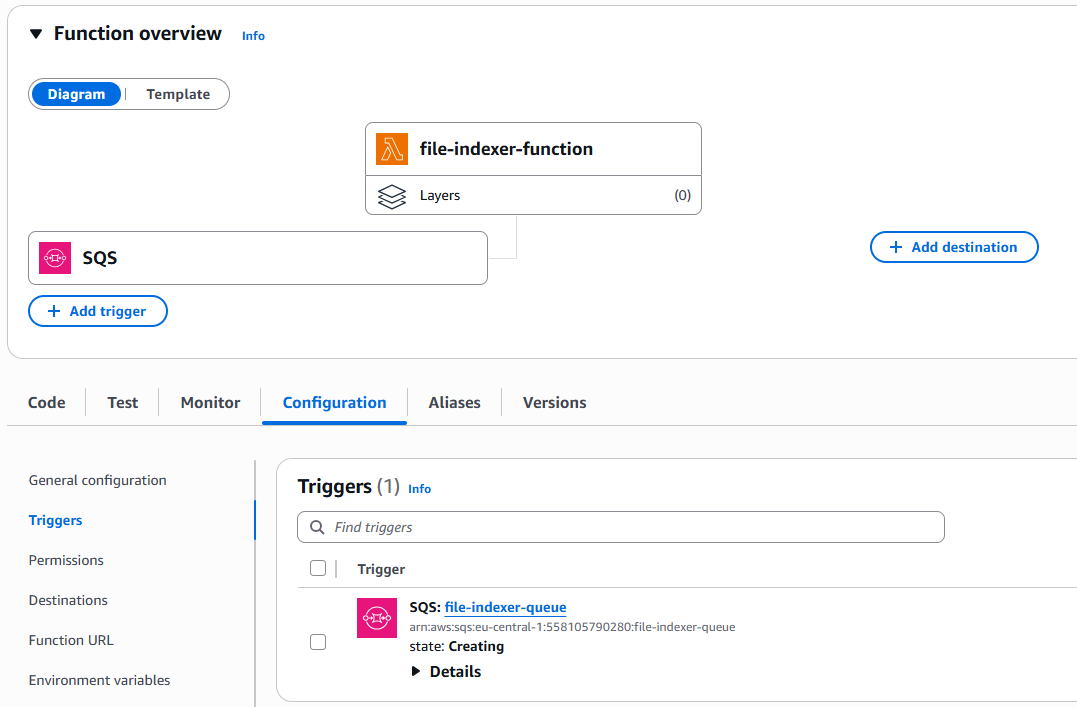
lambda function
With all the configuration complete, we just need to create the code logic that will process these events and save the data into DynamoDB and to make the code simple and easy to follow, I will split it into steps so you can follow along.
Step 1: Import AWS SDK and create DynamoDB client
import { S3Client, HeadObjectCommand } from '@aws-sdk/client-s3';
import {
  DynamoDBClient,
  PutItemCommand,
  DeleteItemCommand,
} from '@aws-sdk/client-dynamodb';

const s3Client = new S3Client({ region: 'eu-central-1' });
const dynamoClient = new DynamoDBClient({ region: 'eu-central-1' });
const TABLE_NAME = 'S3-File-Indexer';
We import clients for S3 and DynamoDB, create client instances to interact with them.
Step 2: Lambda handler and iterating over SQS records
Entry Point & Iterating SQS Messages
export const handler = async (event) => {
  console.log("Processing SQS messages with S3 events");

  for (const sqsRecord of event.Records) {
    try {
      // Parse the S3 event from the SQS message body
      const s3Event = JSON.parse(sqsRecord.body);
Extracting File Info from S3 Event
// Process each S3 record within the SQS message
for (const s3Record of s3Event.Records) {
  const bucketName = s3Record.s3.bucket.name;
  const fileKey = decodeURIComponent(s3Record.s3.object.key.replace(/\+/g, ' '));
  const fileSize = s3Record.s3.object.size;
  const eventName = s3Record.eventName;

if (eventName.startsWith("ObjectCreated")) {
Fetching Metadata from S3
// Get metadata from the S3 object
let metadata = {};
let contentType = 'unknown';

try {
  const headResult = await s3Client.send(
    new HeadObjectCommand({
      Bucket: bucketName,
      Key: fileKey,
    })
  );
  metadata = headResult.Metadata || {};
  contentType = headResult.ContentType || 'unknown';
} catch (err) {
  console.error(`Error fetching S3 metadata for ${fileKey}:`, err.message);
}
Building File Details
const fileName = fileKey.split('/').pop() || fileKey;
const extension = fileName.includes('.') ? '.' + fileName.split('.').pop() : '';
const fileType = metadata['content-type'] || contentType;
const uploadedAt =
  metadata['upload-timestamp'] || new Date(s3Record.eventTime).toISOString();
const userId = metadata['user-id'] || 'unknown';
We fetch object metadata from S3 using HeadObjectCommand. Metadata includes user ID, upload timestamp, and optionally file type. Fallbacks are used if metadata is missing.
Step 3: Storing uploaded file metadata in DynamoDB
// Store metadata in DynamoDB
await dynamoClient.send(
  new PutItemCommand({
    TableName: TABLE_NAME,
    Item: {
      bucketName: { S: bucketName },
      fileKey: { S: fileKey },
      fileName: { S: fileName },
      extension: { S: extension },
      fileType: { S: fileType },
      fileSize: { N: fileSize.toString() },
      uploadedAt: { S: uploadedAt },
      userId: { S: userId },
      createdAt: { S: new Date().toISOString() },
      etag: { S: s3Record.s3.object.eTag || '' },
    },
  })
);

console.log(`File ${fileKey} added to DynamoDB`);
}
Metadata is stored in DynamoDB using PutItemCommand. Each attribute is typed (S for string, N for number), and logs confirm successful insertion.
Step 4: Handling file deletions (ObjectRemoved)
 // Delete from DynamoDB
 else if (eventName.startsWith("ObjectRemoved")) {
     await dynamoClient.send(new DeleteItemCommand({
            TableName: TABLE_NAME,
            Key: {
              bucketName: { S: bucketName },
              fileKey: { S: fileKey },
            },
          }));

          console.log(`File ${fileKey} deleted from DynamoDB`);
        }
      }
    } catch (error) {
      console.error("Error processing SQS message:", error.message);
      throw error; // Re-throw to trigger Lambda retry
    }
  }

  return {
    statusCode: 200,
    body: JSON.stringify({ message: "Successfully processed S3 events" })
  };
};
For deletions, the corresponding item is removed from DynamoDB using DeleteItemCommand. Only the primary key attributes ( bucketName and fileKey) are required.
Step 5: Testing
Now that the code is complete, it’s time to test it. I’ll use the S3 console to upload a file, and as shown in the image below, the file was indexed successfully.
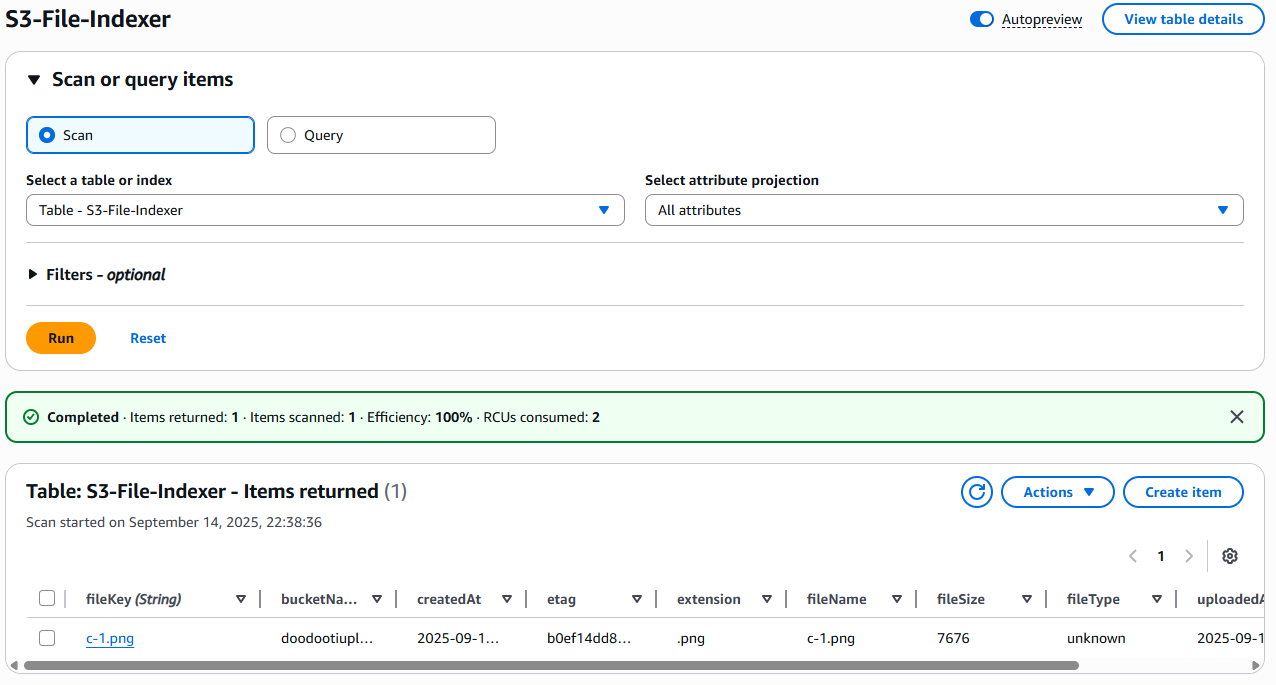
lambda function
import { S3Client, PutObjectCommand } from '@aws-sdk/client-s3';

const s3 = new S3Client({ region: 'eu-central-1' });

// Simple upload with userId
const uploadFile = async (file, userId) => {
  await s3.send(
    new PutObjectCommand({
      Bucket: 'doodootiuploads',
      Key: `users/${userId}/${file.name}`,
      Body: file,
      ContentType: file.type,
      Metadata: {
        'user-id': userId,
        'upload-timestamp': new Date().toISOString(),
      },
    })
  );
};
Conclusion
We’ve built a fully serverless pipeline that indexes files uploaded to S3 by capturing events, processing them with Lambda, and storing metadata in DynamoDB. This approach is scalable, cost-effective, and can be extended to support more complex workflows as needed.